Table of Contents
ToggleYour TV’s built-in speakers sound thin and tinny, but your home theater receiver doesn’t have a free HDMI port, or worse, one of your devices doesn’t support HDMI-ARC at all. Before you start shopping for a new receiver or soundbar, know this: HDMI isn’t the only way to get quality audio from your TV to your sound system. Older receivers, legacy equipment, and even some modern setups work just fine with alternative connections. The trick is knowing which cable matches your gear and what you’ll gain or lose in audio quality. This guide walks through five reliable methods to route TV audio to your home theater without touching an HDMI cable.
Key Takeaways
- Connect TV sound to home theater without HDMI using five reliable methods: optical, RCA, 3.5mm auxiliary, Bluetooth, or wireless adapters—each suited to different equipment and budgets.
- Optical (TOSLINK) cables are the top choice for digital audio, supporting Dolby Digital 5.1 and DTS 5.1 surround sound with immunity to electrical interference and no handshake problems.
- RCA and 3.5mm connections provide simple, cost-effective stereo audio routing for older TVs, vintage receivers, and equipment that predates HDMI compatibility.
- Bluetooth offers cable-free convenience for modern TVs and receivers but introduces 30–200ms latency that can cause lip-sync issues during movies and TV shows.
- Troubleshooting audio problems typically involves verifying correct input selection on the receiver, checking for fully seated cable connections, and ensuring the TV’s audio output setting matches your chosen method.
- Non-HDMI connections eliminate HDMI-ARC handshake failures, work with legacy equipment, and enable secondary audio zones without requiring equipment upgrades.
Why You Might Need Non-HDMI Audio Connections
HDMI-ARC and eARC are convenient when they work, but plenty of real-world scenarios force you to look elsewhere. Older home theater receivers built before 2009 often lack HDMI inputs entirely. Budget TVs sometimes ship with HDMI ports that handle video but don’t pass audio back to external devices. You might also be working with a vintage amplifier that sounds fantastic but predates digital connectivity.
Another common issue: HDMI-ARC handshake problems. Even when both devices support ARC, firmware quirks or incompatible CEC implementations can leave you with no sound or constant dropouts. In those cases, a simple optical or RCA cable sidesteps the trouble entirely.
Non-HDMI connections also shine when you’re adding a secondary audio zone, running a dedicated two-channel music system, or connecting a TV in a garage or workshop where you already have a working amplifier. You don’t always need the latest tech, you just need sound that works.
Method 1: Using Optical (TOSLINK) Cable for Digital Audio
An optical audio cable (also called TOSLINK or Fiber Optic) is the go-to choice for digital sound without HDMI. It transmits audio as pulses of light through a fiber-optic strand, making it immune to electrical interference and cable noise.
Most flat-screen TVs built after 2010 include an optical output on the back panel, usually labeled “Optical Out,” “Digital Audio Out,” or “TOSLINK.” The port is square with a hinged dust cover. On the receiver side, look for a matching input labeled “Optical In” or “Digital In.”
What you’ll get: Dolby Digital 5.1 and DTS 5.1 surround sound. That’s enough for most streaming apps, Blu-rays, and cable boxes. You won’t get lossless formats like Dolby TrueHD or Atmos over standard optical, but for everyday viewing, the quality is excellent.
How to connect:
- Remove the protective caps from both ends of the optical cable. You’ll see a red glow if you hold it up to light, that’s normal.
- Insert one end into the TV’s optical output. It only fits one way: don’t force it.
- Plug the other end into the receiver’s optical input.
- Power on the TV and receiver. Navigate to the TV’s audio settings menu.
- Select “Optical” or “Digital Audio Out” as the TV speaker output. Some TVs label this “External Speakers” or “Audio System.”
- On the receiver, switch the input selector to the corresponding optical input (often labeled “TV” or “Opt 1”).
- Test with a movie or show. You should hear audio through the home theater speakers.
Cable length: Optical cables work reliably up to 15 feet without signal loss. Beyond that, you may need a repeater. Choose a cable with reinforced connectors if you’ll be plugging and unplugging frequently.
Many experts covering smart home setups and audio gear recommend optical for its simplicity and lack of handshake issues compared to HDMI-ARC.
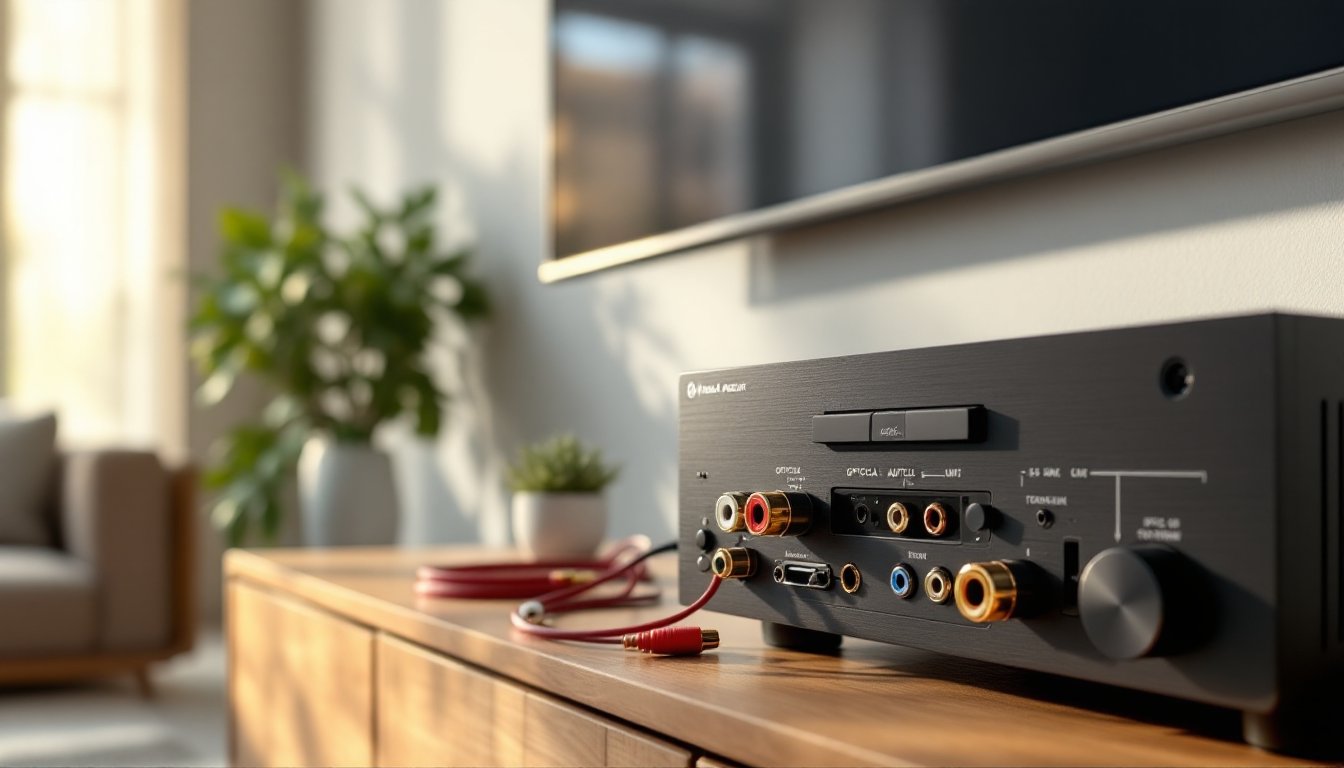
Method 2: Connecting via RCA Cables for Analog Sound
RCA cables are the classic red-and-white (or red-and-black) connectors you’ll find on older TVs and vintage receivers. They carry analog stereo audio, two channels, left and right. No surround sound, but the connection is bulletproof and works with nearly any amplifier made in the last 50 years.
Check the TV’s output panel for a pair of RCA jacks labeled “Audio Out,” “L/R Out,” or “Line Out.” Some newer TVs skip RCA outputs entirely, but mid-range and budget models often include them. On the receiver, you’ll plug into any stereo input: “AUX,” “CD,” “Tape,” or “TV” inputs all work.
How to connect:
- Match the cable colors to the jacks: red to red (right channel), white or black to white or black (left channel).
- Insert the cables firmly. Loose connections cause hum or dropout in one channel.
- Turn on both devices. Set the TV’s audio output to “Line Out” or “External Speakers” in the settings menu.
- Select the corresponding input on your receiver (e.g., “AUX” if you used the AUX input).
- Adjust volume on both the receiver and TV. Some TVs fix the line-out level: others let you control it from the remote.
Limitations: RCA is stereo only. You won’t get any surround encoding. If your receiver has a “surround mode” or “DSP mode” button, you can simulate surround, but it’s not true multichannel audio.
Cable quality: For runs under 10 feet, any decent RCA cable works. Avoid bargain-bin cables with flimsy connectors, they corrode quickly. Gold-plated connectors resist oxidation if your gear lives in a humid basement or garage.
RCA remains a solid choice for two-channel music listening or when connecting a TV to a vintage integrated amplifier that sounds better than most modern receivers.
Method 3: Using a 3.5mm Auxiliary Cable or Headphone Jack
If your TV has a 3.5mm headphone jack and your receiver or powered speakers have a 3.5mm or RCA input, a simple aux cable bridges the gap. This is the fastest method for connecting to desktop speakers, portable amplifiers, or older gear without optical inputs.
What you need: A 3.5mm-to-3.5mm cable, or a 3.5mm-to-RCA adapter cable (one 3.5mm plug on one end, red and white RCA plugs on the other). These cost a few dollars at any electronics retailer.
How to connect:
- Locate the headphone or “Audio Out (3.5mm)” jack on the TV. It’s usually on the side or back panel.
- Plug the 3.5mm end into the TV.
- Connect the other end to the receiver’s AUX input (3.5mm) or use an adapter to connect to RCA inputs.
- Go into the TV’s audio settings and select “Headphone” or “Audio Out (3.5mm)” as the output.
- Set the receiver to the matching input.
- Control volume from the receiver. The TV’s headphone output may have independent volume control, test to see which works best.
Pros and cons: This connection is quick and cheap, but audio quality depends on the TV’s headphone amp. Cheaper TVs often have noisy headphone circuits with audible hiss at high volume. It’s a stereo-only connection, same as RCA.
When to use it: Great for temporary setups, dorm rooms, workshops, or connecting a TV to a small amplifier in a garage or shed. Also handy if you’re testing audio routing before investing in better cables.
If the TV disables its internal speakers when you plug in a 3.5mm cable, that’s normal. You can’t run both simultaneously unless the TV specifically offers that option in settings.
Method 4: Wireless Bluetooth Connection for Modern Convenience
Bluetooth offers a cable-free option if both your TV and receiver (or soundbar) support it. Many TVs manufactured after 2018 include Bluetooth transmission, and plenty of modern receivers and powered speakers can receive a Bluetooth signal.
Check compatibility first. Not all TVs transmit Bluetooth, some only receive it for pairing headphones or keyboards. Dig into the TV’s settings menu under “Sound,” “Audio,” or “Bluetooth” to confirm it can send audio to external devices.
How to connect:
- Put the receiver or soundbar into Bluetooth pairing mode. This usually involves holding a “Pair” or “Bluetooth” button until an LED blinks.
- On the TV, open the audio or Bluetooth settings menu.
- Select “Bluetooth Speaker List” or “Add Bluetooth Device.”
- Choose your receiver or soundbar from the list of available devices.
- Confirm the pairing. You should hear a chime or see a confirmation message.
- Set the TV’s audio output to the Bluetooth device. The TV’s internal speakers should mute automatically.
Latency warning: Bluetooth introduces a slight delay (typically 30–200 milliseconds) between picture and sound. For music or podcasts, you won’t notice. For movies and TV, lip-sync issues can be distracting. Some devices support aptX Low Latency or aptX HD codecs, which reduce lag to under 40ms, much more tolerable.
If your receiver doesn’t have Bluetooth, you can add a Bluetooth receiver adapter (a small box with RCA or optical outputs) for around $25–$40. Plug it into an open input on your receiver and pair your TV to the adapter.
Wireless convenience comes at a cost: you’re limited to stereo or compressed surround, and audio quality won’t match a wired optical or RCA connection. Bluetooth works best for casual viewing, not critical listening or home theater enthusiasts chasing the best possible sound.
For more guidance on wireless audio and modern connectivity options, resources like Tom’s Guide often test and compare Bluetooth latency across different TV and receiver models.
Troubleshooting Common Connection Issues
No sound after connecting:
- Double-check the TV’s audio output setting. Many TVs default back to internal speakers after a firmware update or power cycle.
- Confirm the receiver is set to the correct input. It’s easy to pick “Optical 1” when you’re plugged into “Optical 2.”
- For optical cables, make sure the protective caps are off and the cable clicks into place. A half-seated optical cable won’t transmit signal.
- Try a different cable. Optical cables can break internally even if they look fine from the outside.
Audio cutting in and out:
- Optical cables are sensitive to tight bends. Avoid kinking or looping them sharply.
- Bluetooth dropouts usually mean interference from Wi-Fi routers, microwaves, or other wireless devices. Move the receiver closer to the TV or switch Wi-Fi to a 5GHz band.
- RCA cables pick up hum if they run parallel to power cords. Route them separately or use shielded cables.
Only one channel plays (RCA or 3.5mm):
- Check that both plugs are fully seated. Partial insertion is a common culprit.
- Test with a different cable. One internal wire may be broken.
- Swap left and right cables to isolate whether the issue is the cable or the jack.
Lip-sync delay (Bluetooth):
- Look for an “Audio Delay” or “AV Sync” setting in the TV’s audio menu. Adding 50–150ms of video delay can realign picture and sound.
- If your receiver has a sync adjustment, try tweaking that instead.
- As a last resort, switch to a wired connection. Bluetooth lag is hardware-dependent and sometimes unfixable.
Volume too low or distorted:
- For 3.5mm and RCA connections, the TV’s output level might be too high or too low. Adjust the TV’s “headphone volume” or “line-out level” in settings.
- Distortion usually means the signal is overdriven. Lower the TV’s output volume and raise the receiver’s input gain.
If you’re renovating a media room or upgrading older equipment, This Old House often covers integrating vintage audio gear with modern TVs in their tech and electronics tutorials.
Conclusion
HDMI might be the default today, but optical, RCA, 3.5mm, and Bluetooth connections still deliver reliable audio for home theater setups old and new. Pick optical for digital surround without the HDMI headaches, RCA or 3.5mm for simplicity and vintage gear compatibility, or Bluetooth when you value convenience over perfect sync. Match the connection to your equipment, follow the steps, and you’ll have your TV audio routed to your home theater in under ten minutes, no HDMI required.