Table of Contents
ToggleBuilding a modern home theater isn’t just about buying a big screen and some speakers. It’s about understanding how room acoustics, equipment placement, and smart integration work together to create an immersive experience. Whether you’re converting a basement, spare bedroom, or dedicated media room, the decisions you make during planning will determine whether you end up with a true theater or just another living room with a TV. This guide walks through the practical considerations, from equipment specs to soundproofing, that separate amateur setups from professional-grade home theaters.
Key Takeaways
- A modern home theater succeeds through intentional design of image quality, audio fidelity, and environmental control—not just buying expensive equipment.
- Room dimensions should follow a 1:1.6:2.6 ratio (height:width:length) and avoid perfect cubes to minimize standing waves and acoustic dead spots.
- Allocate roughly 40% of your budget to audio quality with a minimum 5.1.2 setup, as discrete speakers deliver the imaging precision that separates professional home theater from basic TV rooms.
- Plan soundproofing and acoustic treatment during construction using decoupled walls, mass-loaded vinyl, and proper door seals to control both external noise and internal reflections.
- Integrate smart automation with one-button scene programming, hardwired networking (Cat6a or fiber), and HDMI infrastructure planning to ensure seamless operation for streaming, gaming, and movie content.
- Theater seating geometry, tiered layouts, and lighting design (bias lighting, step lights, dark wall colors) are equally critical to equipment specs for creating a true immersive viewing experience.
What Defines a Modern Home Theater?
A modern home theater prioritizes three core elements: image quality, audio fidelity, and environmental control. Unlike traditional setups that relied on bulky equipment and limited automation, today’s systems integrate 4K or 8K projection, Dolby Atmos surround sound, and smart home connectivity.
The defining feature isn’t the price tag, it’s intentional design. A dedicated theater controls lighting, manages sound reflections, and positions seating within the optimal viewing cone. You’re aiming for a 120-degree viewing angle from the screen center, with the first row no closer than 1.5x the screen width.
Modern systems also emphasize flexibility. Wireless streaming, voice control, and multi-zone audio allow the theater to function as a gaming room, sports-viewing space, or family movie night venue. The equipment should adapt to different content types without requiring manual recalibration.
Choosing the Right Room and Layout for Your Home Theater
Room selection impacts every downstream decision. Basements work well because they’re naturally isolated from street noise and have minimal windows, but you’ll need to address moisture control and potentially lower ceiling heights. Spare bedrooms offer easier HVAC integration but may require more aggressive soundproofing.
Ideal room dimensions follow a 1:1.6:2.6 ratio (height:width:length) to minimize standing waves, sound reflections that create dead spots. A 10-foot ceiling suggests a room roughly 16 feet wide and 26 feet long. Avoid perfect cubes: they amplify bass unevenly.
Layout considerations:
• Screen placement: Mount on the shortest wall, at least 2 feet from corners to reduce bass buildup
• Seating rows: Allow 36-42 inches between rows for comfortable legroom
• Equipment rack location: Rear wall placement keeps cable runs short and equipment accessible
• Door position: Rear or side entry prevents light spill and traffic interruptions
If you’re working with a multipurpose room, plan for blackout capability and removable acoustic panels. Load-bearing walls limit your options, so identify them early, removing one requires an engineer’s stamp and a building permit in most jurisdictions.
Essential Equipment: Screens, Projectors, and Sound Systems
Projectors vs. Large-Format Displays: For screens over 100 inches, projectors offer better value. A quality 4K laser projector (3,000+ lumens) handles ambient light better than older lamp-based models and lasts 20,000+ hours. For smaller rooms (under 12 feet viewing distance), consider a 75-85 inch OLED or Mini-LED TV for superior contrast without light control concerns.
Screen selection matters more than most DIYers realize. A fixed-frame acoustically transparent screen (1.0-1.3 gain) allows center-channel speakers to mount directly behind it, improving dialogue clarity. Screen height should position the bottom edge 24-30 inches off the floor for optimal sightlines from tiered seating.
Audio system configuration:
• Minimum 5.1.2 setup: Five ear-level speakers, one subwoofer, two height channels for Atmos
• Speaker placement: Front L/R at ±22-30 degrees from center seat, surrounds at ±90-110 degrees, height channels at ±65 degrees elevation
• Subwoofer positioning: Corner placement maximizes output but can cause boomy bass: try 1/3 room length from a wall for tighter response
• AVR power: Match receiver wattage to speaker sensitivity, 87dB speakers need 100+ watts per channel for headroom
Skip the soundbar temptation. Discrete speakers provide the imaging precision and dynamic range that modern home theater setups demand. Budget roughly 40% of total cost for audio, it’s where most consumer systems fall short.
Smart Technology and Automation Integration
Modern theaters integrate with whole-home automation platforms like Control4, Crestron, or open-source Home Assistant. The goal: one-button operation that dims lights, lowers the screen, powers equipment, and loads your streaming service.
Essential automation features:
• Scene programming: “Movie” mode triggers blackout shades, sets HVAC to 68°F, and activates equipment in sequence
• Voice control: Alexa or Google Assistant integration for volume, playback, and lighting (disable wake words during playback)
• Network streaming: Hardwire equipment with Cat6a or fiber for 4K HDR content, wireless introduces buffering and compression artifacts
• Remote access: Monitor system status and troubleshoot without entering the theater
Plan conduit runs during framing. Pull two 1.5-inch PVC conduits from the equipment rack to the projector location, one for HDMI/power, one for future upgrades. Many smart home technology platforms now support Matter protocol for cross-platform device compatibility.
HDMI infrastructure requires careful planning. Runs over 25 feet need active cables or fiber extenders to maintain 4K 120Hz signals. Label both ends of every cable during installation, troubleshooting a mislabeled rack is a nightmare.
Acoustic Treatment and Soundproofing Solutions
Soundproofing (blocking external noise) and acoustic treatment (managing internal reflections) serve different purposes. Most home theaters need both.
Soundproofing basics:
• Decouple walls: Build a staggered-stud wall (2×4 studs on 2×6 plates, offset 12 inches OC) filled with Roxul Safe’n’Sound or fiberglass batts
• Mass-loaded vinyl: Add MLV (1-2 lb/sq ft) between drywall layers for transmission loss
• Resilient channels or clips: Mount drywall on RSIC-1 clips to isolate vibration, improves STC rating by 8-12 points
• Seal penetrations: Use acoustical caulk around electrical boxes, HVAC registers, and door frames
Doors are the weak point. A solid-core door (1.75 inches thick) with perimeter seals and automatic drop threshold stops most leakage. Expect to spend $400-600 on a quality theater door.
Interior acoustic treatment:
• First reflection points: Mount 2-inch absorption panels where sound bounces from speakers to seating (typically side walls at ear height)
• Bass traps: Place 4-inch panels or corner traps where walls meet ceiling to control low-frequency buildup
• Diffusion: Rear wall diffusers scatter reflections without deadening the space, important for surround imaging
Don’t rely on foam egg crates or moving blankets. Proper treatment uses panels with an NRC rating of 0.8+ and corner traps extending at least 24 inches from corners. Coverage should treat 25-35% of wall surface.
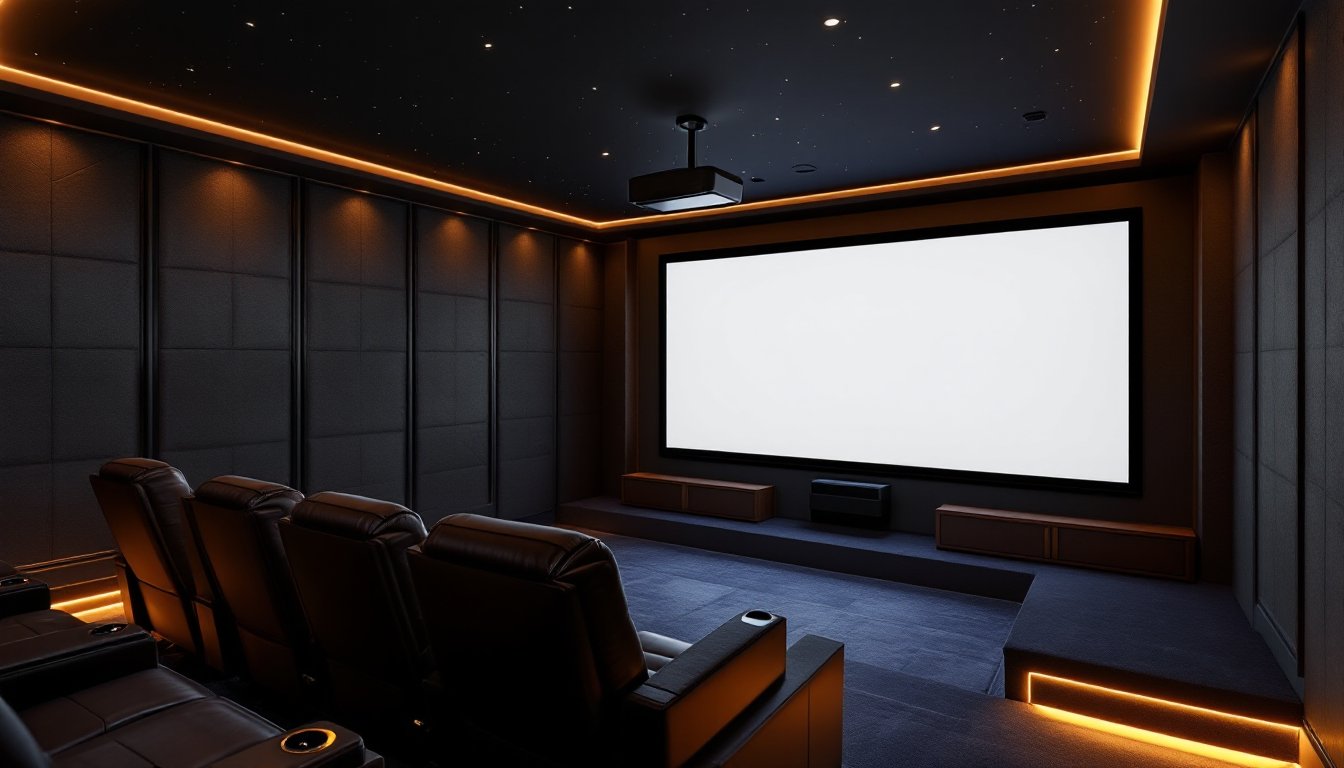
Seating, Lighting, and Interior Design Elements
Theater seating isn’t just about comfort, it affects viewing geometry and acoustic performance. Dedicated theater recliners (with power headrests and USB charging) typically measure 36-40 inches wide. Allow 6-8 inches between seats for armrest clearance.
Tiered seating improves sightlines when you’ve got multiple rows. Each riser should elevate the eye height of the rear row 12 inches above the row in front. Build risers from 2×10 joists on 16-inch centers, topped with 3/4-inch plywood and carpet. Residential codes often require handrails for platforms over 30 inches, check local requirements.
Lighting design:
• Bias lighting: LED strips behind the screen (6500K, 10% brightness) reduce eye strain without washing out blacks
• Step lights: Recessed floor LEDs along aisles provide safe navigation without screen glare
• Dimmer controls: 0-10V or DMX dimmers allow gradual transitions, avoid standard Triac dimmers that hum at low levels
• Starlight ceiling: Fiber optic or LED ceiling panels add ambiance without light reflection
Wall color impacts perceived contrast. Dark paint (charcoal, navy, or dedicated theater black) prevents light reflection that washes out the image. Ceiling and carpet should also be dark. Many modern design approaches balance aesthetics with acoustic function through fabric-wrapped panels that serve as both art and treatment.
HVAC considerations: Theaters generate heat, plan for 500-800 BTU/hour per person plus equipment load. Oversized return ducts (8×20 inches minimum) and baffled supply registers reduce air noise that competes with dialogue.
Conclusion
A well-executed home theater rewards careful planning more than unlimited budget. The rooms that impress aren’t necessarily the ones with the most expensive gear, they’re the ones where equipment, acoustics, and layout work as a system. Start with room selection and soundproofing during construction or renovation, then layer in equipment and automation. Rushing the foundation just means rebuilding it later when sound bleeds into bedrooms or bass rattles the ceiling.